Installing the Sentry Disinfecting System
The Sentry Disinfecting System is a vehicle disinfectant delivery system that improves on-farm biosecurity.
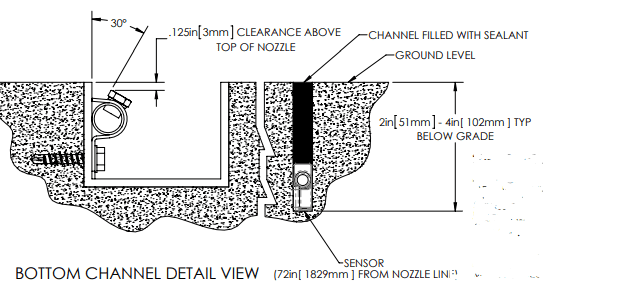
When setting up a new Sentry System, it is ideal to plan out where the trough for the undercarriage sprayer line needs to be, as well as the magnetic sensors before pouring the concrete. If the system is being installed in an area that already has concrete, it is possible to notch or cut the slab to accommodate the system. The trough needs to be a minimum depth of 1.5 inches and a minimum of two inches wide. The magnetic sensor should be mounted two inches deep and will need conduit or similar sturdy material run for the wiring. Sensors capable of even slight movement from vehicle weight will result in constant need of re-calibration.
The arch supports can be made of almost anything rigid for the uprights and the top sprayer pipe to the below dimensions. (arch supports are not included in the system).
 When tightening the compression fittings hand tighten then, turn them one and one-quarter turns with a wrench to properly lock/seal the fittings. When connecting the water to the system be sure that you have a minimum of seven gallons per minute. Ideally the water pressure should be between 20 and 60 PSI and not smaller than ¾” water supply line.
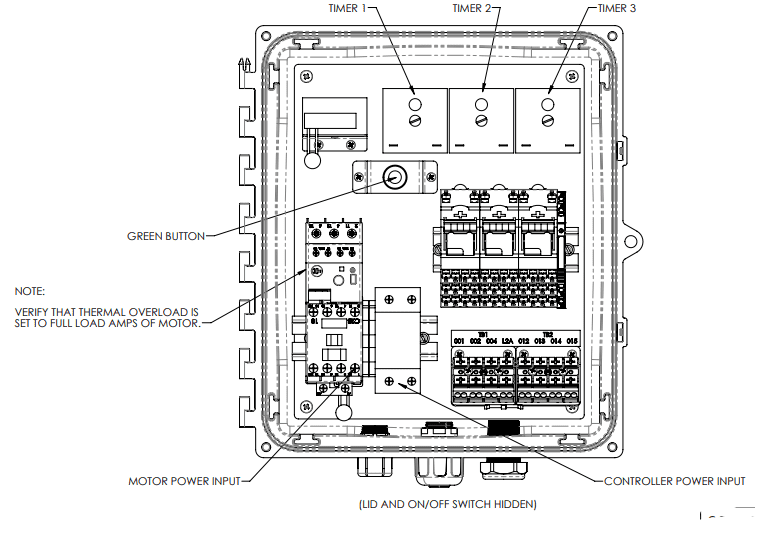
When wiring the control box, be sure to wire both the controller power supply and the motor power supply. Three timers will need to be set. Timer 1 sets the time between water supply inlet opening and pump start up. Timer 2 sets the time between sensor initial activation and system start-up. Timer 3 sets the time the system will run after sensor de-activation. When setting the timers for the run cycle, Timer 1 and Timer 2 will most likely need set as low as they will go, and Timer 3 will need to be set at a minimum of a minute (the time will depend on the size of the vehicle and your setup).
The green button in the control is for calibrating the sensor and setting the sensitivity. To calibrate the sensor, turn the switch to Auto and press the green button one time. It should flash twelve times and calibration is complete when it’s done flashing. To set the sensitivity, with the switch in the auto position, press the green button two times quickly (one flash is least sensitive six flashes is most sensitive). When you reach the desired sensitivity, press the green button one time.