 Over the past few years producers, integrators, and manufacturers have worked hard to develop an antibiotic-free poultry production system that works. The system uses a series of supplements such as probiotics, prebiotics, essential oils or additional electrolytes, vitamins, and minerals to encourage healthy intestinal flora and build resistance to disease. However, with time, we’ve started to see the collateral effects that these supplements have on equipment systems, primarily, water lines.
The supplements are administered through the water lines, which are often already a haven for bacteria growth, and can encourage more rapid biofilm development if not properly managed. For instance, probiotics are a live bacteria that thrive in the gut, but also thrive in the drinker system. Similarly, prebiotics – whose function serves as a food source for good bacteria in the gut – really serves as a food source for any bacteria anywhere, accelerating the growth of both good and bad bacteria in the water line. Essential oils are sticky and difficult to clean and can create a breeding ground for the bacteria in the water lines. If not managed, the resulting biofilm clogs up regulators, water lines, and nipple drinkers. Biofilm is a tricky thing. It grows quickly, harbors bacteria, protects that bacteria from cleaning agents, and then releases those bacteria back into the water, potentially causing severe health issues.
Knowing the make-up of your water is key to developing both an effective antibiotic free treatment program, and a water sanitization program. A high iron content can nourish E. coli bacteria. Sulfur can be broken down by bacteria to create hydrogen sulfide gas, which is extremely corrosive to both equipment and livestock. Knowing the contents of the water can help to make informed decisions about using vitamins and minerals. Vitamin additives encourage growth of micro-organisms in the water, and mineral additives (depending on the chemical make-up of the water) can result in mineral build ups and blockages within the line or eroded drinker parts leading to leaky drinkers.
Knowing what’s in the water is the first step. Equally as important is knowing how much bacteria are actually inside the watering system.
Doing a drip sample gives us a vague idea. It’s a representation of how much bacteria are being released into the water, but it doesn’t tell us how much bacteria are living in the line itself. By swabbing the inside of the line, we can test the biofilm to get a better idea of how much of it is present.
 Mary Scanting and Dr. Susan Watkins of The University of Arkansas have outlined the swabbing procedure step-by-step, and we share it with you here:
- Shut the water off to the water line being tested.
- Remove the cap from the end of the water line or detach the drain hose from the end of the line and allow excess water to drain out so the sponge will be absorbing biofilm and not just water. If a valve cap is present, remove it. Do not sample through the valve cap as it will not be a representative sample. Sample as close as possible to the standpipe.
- Wipe off the outside threads of the water line with 91% alcohol in case your sponge brushes against them when you swab.
- Wipe down a pair of extra-long tweezers (these need to be 6 to 8 inches long) with alcohol or dip in alcohol. Use a flame starter to burn off alcohol and sterilize tweezers.
- Remove the cap of the swab vial while being extremely cautious not to touch the edge of the vial or the inside of the cap against anything.
- Put the sterilized tweezers into the vial and grasp the sponge. Push the sponge against the inside of the vial and turn to squeeze out the excess moisture. Removing the sponge.
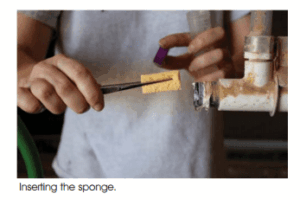
 Remove the sponge from the vial and insert into the end of the open pipe, being extremely careful not to touch anything as the sponge enters the pipe. Inserting the sponge.
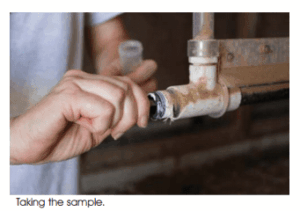
- Insert the sponge at least 4 inches into the pipe, twisting it as you go in and back out. Taking the sample. Swabbing water lines can be done for any type of line, but just make sure to remove any parts that will prevent you from getting the sponge into the true water line.
- Replace the sponge into the BPD or sterile water in the 50 ml vial and tightly close the cap to prevent leakage. Vigorously shake the vial to release an even number of bacteria from the sponge into the BPD solution. Carefully label the sample with a waterproof marker and then store the sample at refrigeration temperature (40° 45°F), even in transport until the sample arrives at the lab. For best results, samples should be submitted to the lab within 24 to 48 hours. Repeat this procedure for each testing site, being sure to sterilize the tweezers before using them for each sponge.
 Remove the sponge from the vial and insert into the end of the open pipe, being extremely careful not to touch anything as the sponge enters the pipe. Inserting the sponge.
Your local Extension can run the tests for you and provide a report. Using the information provided, you can start to develop a program that will improve the water quality in the poultry house, and the performance quality of the birds.